0%

几种常见的算法记录

记录几种常见的算法,使用java实现的

排序的介绍

排序就是将一群数据,依据指定的顺序进行排列的过程
排序的分类:

1.内部排序

指将需要处理的所有数据都加载到内部存储起中进行排序
包括(交换式排序法,选择式排序法,插入式排序法)

2.外部排序法

由于数据量过大,无法全部加载到内存中,需要借助外部存储进行排序
包括(合并排序法,直接合并排序法)
排序(Sorting)是数据处理中一种很重要的运算,同时也是很常见的运算,一般数据处理工作
中25%的时间都在进行排序,简单的说,排序就是把一组记录(元素)按照某个域值的递增(从小到大)
或者递减(从大到小)的次序重新排列的过程

3交换式排序

交换式排序属于内部排序法,是运用数据值比较后,依判断规则对数据位置进行交换,以达到排序的目的交换式排序又可分为:
1.冒泡排序法(Bubble sort)
2.快速排序法 (Quick sort)

1.冒泡排序

1
2
3
4
5
6
7
8
9
10
11
12
13
14
15
16
17
18
19
20
21
22
23
24
25
26
27
28
class Bubble {
// 排序方法
/*
* 交换式排序 - 冒泡排序
* 基本思想:通过对待排序序列从后向前(从下标较大的元素开始),依次比较相邻元素的排序码
* 若发现逆序则交换,使排序码较小的元素逐渐从后部移到前部(从下标较大的单元移向较小
* 的单元),就像水底下的气泡一样逐渐向上冒的过程
* 因为排序的过程中,各元素不断接近自己的位置,如果一趟比较下来,没有进行交换的过程,就说明序列
* 有序,因此在排序过程中设置一个标志flag判断元素是否进行过交换,从而减少不必要的比较
* */
// 冒泡排序
public static void Sort(int[] array) {
int temp = 0;// 中间变量
// 外部循环 它决定一共走几趟
for (int i = 0; i < array.length - 1; i++) {
// 内层循环 开始逐个比较 如果发现前一个数比后一个数大 则交换
for (int j = 0; j < array.length - 1 - i; j++) {
if (array[j] > array[j + 1]) {
// 换位
temp = array[j];
array[j] = array[j + 1];
array[j + 1] = temp;
}
}
}

}
}

2.选择排序法

class Selection{
    /*
     * 选择式排序法 - 选择排序法
     * 选择式排序法也属于内部排序法,是从欲排序的数据中,按照指定的规则选出某一元素
     * 经过和其他元素,重整,再依原则交换位置后达到排序的目的
     * 
     * 基本思想:第一次从R[0]-R[n - 1]中选取最小值,与R[0]交换,第二次从R[1]-R[n - 1]中
     * 选取最小值,与R[1]交换,第三次从R[2]-R[n - 1]中选取最小值与R[2]交换,...,第R[i - 1] -
     * R[n - 1]中选取最小值,与R[i - 1]交换,... ,第R[n-2]-R[n - 1]中选取最小值,与R[n - 2]
     * 交换,总共通过n - 1次,得到一个按排序码从小到大排列的有序序列
     * 
     * */
    static void Sort(int[] array){
        int temp = 0;
        for (int i = 0; i < array.length - 1; i++) {
            //认为第一个数就是最小的
            int min = array[i];
            //记录最小数的下标
            int minIndex = i;
            for (int j = i + 1; j < array.length; j++) {
                if (min > array[j]) {
                    //修改最小值
                    min = array[j];
                    minIndex = j;
                }
            }
            //当退出for找到这次的最小值
            temp = array[i];
            array[i] = array[minIndex];
            array[minIndex] = temp;
        }

    }
}
1
2

### 3. 插入式排序 - 插入式排序法
class InsterSort{ //插入式排序 - 插入式排序法 /* * 插入式排序属于内部排序法,是对欲排序的元素以插入的方式找寻元素的适当位置,以达到排序的目的 * 插入式排序可分为: * 1.插入式排序(INsertion sort) * 2.谢耳排序法(shell sort) * 3.二叉树排序法(Binary-tree sort) * * */ /* * 插入式排序 * 基本思想: * 把n个待排序的元素看成为一个有序表和一个无序表,开始时有序表中只包含一个元素,无序表中包含有n-1个元素, * 排序过程中每次从无序表中取出一个元素,把它的排序码依次与有序表元素的排序码进行比较,将它插入到有序表中的适当位置, * 使之成为新的有序表 * * */ public static void sort(int array[]) { for (int i = 1; i < array.length; i++) { int insertVal = array[i]; //insertVal准备和前一个数比较 int index = i - 1; while (index >= 0 && insertVal < array[index]) { //就把这个array[index]向后移动 array[index + 1] = array[index]; //让index向前移动 index --; } //将insertVal插入到适当位置 array[index + 1] = insertVal; } } }
1
2

### 4.快速排序
class QuickSort{ /* * 快速排序 * 快速排序对冒泡排序的一种改进,是有C.A.R. Hoare在1962年提出来的 * * 基本思想: * 是通过一趟排序将要排序的数据分割成独立的两部分,其中一部分的所有数据都比另一部分的所有数据 * 都要小,然后再按此方法对这两部分数据分别进行快速排序,整个过程可以递归进行, * 以此来达到整个数据变成有序序列 * * */ /** * @param array * 目标数组 * @param left * 起始位 * @param right * 结束位 * * **/ public static void sort(int[] array,int left,int right) { if (left < right) { int i = left, j = right, x = array[left]; while (i < j) { while (i < j && array[j] >= x) {//从右向左找到第一个小于x的数 j --; } if (i < j) { array[i ++] = array[j]; } while (i < j && array[i] < x ) { i ++; } if (i < j) { array[j --] = array[i]; } } array[i] = x; sort(array,left,i - 1);//递归调用 sort(array,i + 1,right); } } }
1
2

## main函数里面使用
public static void main(String[] args) { // TODO Auto-generated method stub // int array[] = { 1, 5, 4, 6, 8, 4, 1, 3, 6, 9, 41, 3, 6, 1, 3, -10}; //创建100000个数据 int len = 80000000; int array[] = new int[len]; for (int i = 0; i < len; i++) { //让程序随机产生1 - 100000数 int t = (int) (Math.random() * len);//会随机产生一个0 ~ 1 array[i] = t; } //在排序前打印系统时间 Calendar calendar1 = Calendar.getInstance(); System.out.println("排序前" + calendar1.getTime()); // Bubble.Sort(array);//冒泡排序 // Selection.Sort(array); //选择排序 // InsterSort.sort(array);//插入排序 QuickSort.sort(array, 0, array.length - 1);;//快速排序 calendar1 = Calendar.getInstance();//重新获取单例 System.out.println("排序前" + calendar1.getTime()); // for (int i = 0; i < array.length; i++) { // System.out.print(array[i] + " "); // } } ```
ReactiveCocoa的初步用法

1.创建UI便于测试

1
2
3
4
5
6
7
8
9
10
11
12
13
14
15
16
17
18
19
20
21
22
23
24
25
26
27
28
29
30
31
32
33
34
35
36
37
38
39
40
//创建一个UITextField
UITextField *textFild = [[UITextField alloc]init];
textFild.backgroundColor = [UIColor orangeColor];
[self addSubview:textFild];
[textFild mas_makeConstraints:^(MASConstraintMaker *make) {
make.left.mas_equalTo(10);
make.top.mas_equalTo(64 + 5);
make.width.mas_equalTo(100);
make.height.mas_equalTo(50);
}];
//创建一个UIButton
UIButton *button = [UIButton buttonWithType:UIButtonTypeCustom];
button.backgroundColor = [UIColor redColor];
[self addSubview:button];
[button mas_makeConstraints:^(MASConstraintMaker *make) {
make.top.equalTo(textFild.mas_bottom).offset(5);
make.left.equalTo(textFild);
make.width.height.mas_equalTo(50);
}];
//创建一个UIView
UIView *view = [[UIView alloc]init];
view.backgroundColor = [UIColor brownColor];
[self addSubview:view];
[view mas_makeConstraints:^(MASConstraintMaker *make) {
make.top.equalTo(button.mas_bottom).offset(5);
make.left.equalTo(button);
make.width.height.mas_equalTo(50);
}];
//创建一个UIScrollView
UIScrollView *sc = [[UIScrollView alloc]init];
[self addSubview:sc];
[sc mas_makeConstraints:^(MASConstraintMaker *make) {
make.top.equalTo(textFild.mas_top);
make.width.equalTo(@50);
make.height.equalTo(@200);
make.right.equalTo(@(-50));
}];
sc.contentSize = CGSizeMake(50, 800);
sc.backgroundColor = [UIColor redColor];
sc.delegate = self;

2.监听textField的触发事件

1
2
3
4
5
6
7
8
[[textFild rac_signalForControlEvents:UIControlEventEditingChanged] subscribeNext:^(__kindof UIControl * _Nullable x) {
NSLog(@"----");
}];

[textFild.rac_textSignal subscribeNext:^(NSString * _Nullable x) {
// NSLog(@"=======");
NSLog(@"%@",textFild.text);
}];

3.监听Button的点击事件

1
2
3
4
5
6
[[button rac_signalForControlEvents:UIControlEventTouchUpInside]subscribeNext:^(__kindof UIControl * _Nullable x) {
NSLog(@"clicking");
if ([_delegate respondsToSelector:@selector(getClickButtonPostTextFieldText:)]) {
[_delegate getClickButtonPostTextFieldText:textFild.text];
}
}];

4.动态修改UIButton的背景颜色

1
2
3
4
5
[[textFild.rac_textSignal map:^id _Nullable(NSString * _Nullable value) {
return (value.length >= 3) ? [UIColor redColor] : [UIColor brownColor] ;
}]subscribeNext:^(id _Nullable x) {
button.backgroundColor = x;
}];

5.监听手势点击

1
2
3
4
5
UITapGestureRecognizer *tap = [[UITapGestureRecognizer alloc]init];
[view addGestureRecognizer:tap];
[[tap rac_gestureSignal]subscribeNext:^(__kindof UIGestureRecognizer * _Nullable x) {
NSLog(@"Tap Click");
}];

6.监听代理

1
2
3
4
5
6
7
8
[[self rac_signalForSelector:@selector(scrollViewWillBeginDragging:) fromProtocol:@protocol(UIScrollViewDelegate)] subscribeNext:^(id  _Nullable x) {//这里的x是表示 当页面有多个UIScrollView时,可以做判断是哪一个
// NSLog(@"点击了");
// NSLog(@"--- %@ ---",[x first]);
}];

[[self rac_signalForSelector:@selector(scrollViewDidEndDecelerating:) fromProtocol:@protocol(UIScrollViewDelegate)] subscribeNext:^(id _Nullable x) {

}];

1.监听自定义的代理

1
2
3
[[self rac_signalForSelector:@selector(getClickButtonPostTextFieldText:) fromProtocol:@protocol(TestClickDelegate)] subscribeNext:^(id  _Nullable x) {
NSLog(@"******* %@ *****",[x first]);
}];

7.监听通知 -> 键盘弹出和隐藏的通知

1
2
3
4
5
6
7
[[[NSNotificationCenter defaultCenter] rac_addObserverForName:UIKeyboardWillShowNotification object:nil] subscribeNext:^(NSNotification * _Nullable x) {
NSLog(@"键盘弹出");
[[NSNotificationCenter defaultCenter] postNotificationName:@"SHOW_LEYBOARD" object:nil];
}];
[[[NSNotificationCenter defaultCenter] rac_addObserverForName:UIKeyboardWillHideNotification object:nil] subscribeNext:^(NSNotification * _Nullable x) {
NSLog(@"键盘隐藏");
}];

8.KVO –> 监听UIScrollView的滚动

1
2
3
[RACObserve(sc, contentOffset) subscribeNext:^(id  _Nullable x) {
NSLog(@"contentSize -- %@",x);
}];

9.timers

1.延时执行

1
2
3
[[RACScheduler mainThreadScheduler] afterDelay:5 schedule:^{
NSLog(@"这是延时5秒后执行的");
}];

2.定时执行

1
2
3
4
[[RACSignal interval:2 onScheduler:[RACScheduler mainThreadScheduler]]subscribeNext:^(NSDate * _Nullable x) {
NSLog(@"每隔2秒执行一次");
}];

Unable to find a specification for ReactiveObjC

今天Pod ReactiveObjC的时候遇到

1
Unable to find a specification for `ReactiveObjC`

1.先cd到工程目录
2.依次在终端输入一下命令,等它done

1
2
3
4
pod repo remove master
pod setup
pod install

解决 UIPickerView 上面添加UIButton后,不能点击的问题

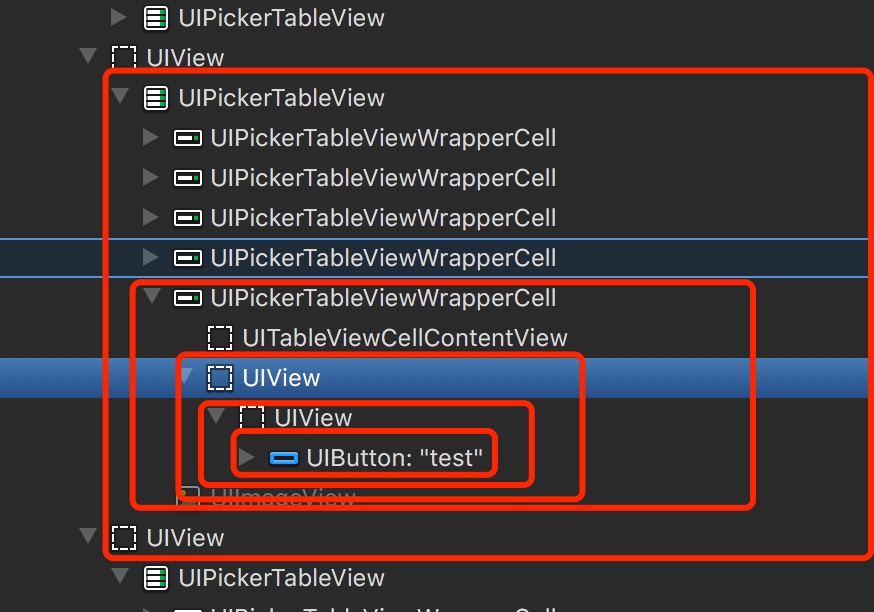
背景: 因为我用的 UIPickerView最多只有三个cell,并且还是动态加载的,当只有一个cell的时候UIPickerView的didSelectRow这个选择代理方法就不起作用了,只能在上面放一个Button,但是问题来了,这个Button居然不能接受到点击事件

1.创建一个PickerView

1
2
3
4
5
6
7
8
9
10
11
- (UIPickerView *)selectPickView{
if (_selectPickView == nil) {
_selectPickView = [[UIPickerView alloc]init];
_selectPickView.delegate = self;
_selectPickView.dataSource = self;
_selectPickView.showsSelectionIndicator = YES;
_selectPickView.backgroundColor = [UIColor whiteColor];
_selectPickView.showsSelectionIndicator = YES;
}
return _selectPickView;
}

2.并遵守其代理

1
2
3
@interface JoinConferenceView()<UIPickerViewDelegate,UIPickerViewDataSource>{

}

3. 相关代理方法

1
2
3
4
5
6
7
8
9
10
11
12
13
14
15
16
17
18
19
20
21
22
23
24
25
26
27
28
29
30
31
32
33
34
35
36
37
38
39
40
- (NSInteger)numberOfComponentsInPickerView:(UIPickerView *)pickerView{
return 1;
}

- (CGFloat)pickerView:(UIPickerView *)pickerView rowHeightForComponent:(NSInteger)component{
return 44.0;
}

- (NSInteger)pickerView:(UIPickerView *)pickerView numberOfRowsInComponent:(NSInteger)component{
return _pickDataArray.count;
}

- (UIView *)pickerView:(UIPickerView *)pickerView viewForRow:(NSInteger)row forComponent:(NSInteger)component reusingView:(UIView *)view{
UIButton *button;
if (view == nil) {
view = [[UIView alloc]init];
view.backgroundColor = [UIColor clearColor];
view.userInteractionEnabled = YES;
if (!button) {
button = [UIButton buttonWithType:UIButtonTypeCustom];
button.frame = CGRectMake(0, 0, pickerView.bounds.size.width, 44.0);
[button setTitle:_pickDataArray[row] forState:UIControlStateNormal];
[button setTitleColor:[UIColor blackColor] forState:UIControlStateNormal];
[button addTarget:self action:@selector(pickButtonAction:) forControlEvents:UIControlEventTouchDown];
button.tag = 1000 + row;
[view addSubview:button];
}
}
return view;
}
//这里硬是触发不了
- (void)pickButtonAction:(UIButton *)button{
[_selectPickView selectRow:button.tag - 1000 inComponent:0 animated:YES];
_passCodeTextField.text = _pickDataArray[button.tag - 1000];
}

- (void)pickerView:(UIPickerView *)pickerView didSelectRow:(NSInteger)row inComponent:(NSInteger)component{
_passCodeTextField.text = _pickDataArray[row];
}

4.后来用Reveal看了一下UI,原来是PickerView的cell挡住了

IMG_2900

5.所以,现在只能用重写 hitTest:

1
2
3
4
5
6
7
8
//防止PickerView的cell遮挡Button的点击事件
- (UIView *)hitTest:(CGPoint)point withEvent:(UIEvent *)event{
id view = [super hitTest:point withEvent:event];
if ([view isKindOfClass:[HWJoinConferenceView class]]) {//防止点击到HWJoinConferenceView,引起无限递归
return nil;
}
return [view hitTest:[self convertPoint:point toView:view] withEvent:event];
}

已损坏,打不开,请移到废纸篓

今天在安装MWeb的时候出现了,以损坏,打不开,请移到废纸篓 的提示,如下图所示
![屏幕快照 2017-03-16 上午9.22.02](已损坏-打不开-请移到废纸篓/屏幕快照 2017-03-16 上午9.22.02.png)

一般的做法是直接在隐私里面打开任何来源即可,可是在最新的系统里面却没有这个选项,
![屏幕快照 2017-03-16 上午9.22.23](已损坏-打不开-请移到废纸篓/屏幕快照 2017-03-16 上午9.22.23.png)

后来Google一把,原来是macOS Sierra 把这个隐藏了,需要用终端命令打开
输入以下命令

1
sudo spctl --master-disable 

然后输入你电脑的密码,再进入隐私里面,就有了
![屏幕快照 2017-03-16 上午9.25.08](已损坏-打不开-请移到废纸篓/屏幕快照 2017-03-16 上午9.25.08.png)